Why in the Hell Would You Cover That Up?

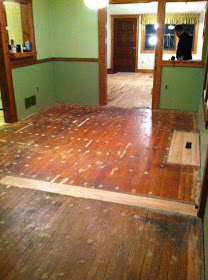
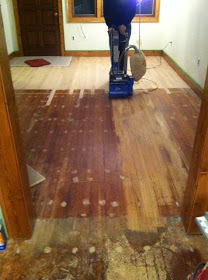
*Bonus points if you caught the Nicole Curtis reference! This is part 2 of our “Drop it to the Floor” hardwood floor renovation. When we left off, this was how our floors looked:
Filling in the Cracks
Now that all of the holes in the floor were patched, it was time to fill in the cracks. We used Elmer’s Carpenter’s Wood Filler to fill in the cracks. To use, we just took a big blob of putty and smashed it into the crack. Once it was filled, we smoothed it over with a putty knife.
Sanding the Floors
We knew we needed a sander, but I wanted someone that would explain the process to me as if I was a 5 year old. We chose a local equipment rental place, Button’s Rent It, and they were wonderful. On top of explaining everything to me in detail, they gave me a DVD that shows the process as well. I didn’t feel like a dumb girl trying to do a boy’s job. We had to rent a belt sander to sand the main part of the floors, and we also rented an orbital sander to sand the edges. They tell you to wear earplugs while you sand, and I thought, “I worked alongside monster trucks and dirt bikes for 7 years, I don’t need no stinkin’ earplugs.” Um, yes you do. The sanders are SO LOUD!
The Button man explained to me that there were three different grits that we should use on our floors. The thickest one (that looked like a pebbled road!) would take off all of the varnish and stain from our floors. Since we were charged per piece of sandpaper, he told us that we could probably go from the thickest grit paper to the finest grit of the papers to smooth out our floors. His tips definitely worked AND saved us time and money. We originally set out with Jeff using the belt sander, and I was using the orbital sander. Ha! I turned on the damn thing and it nearly knocked me over! Picture this, you have a 25 pound machine that you have to hold in both hands in a deep squat position. Then, when you want to move to another section of floor, you have to smoothly carry this squirmy thing in a sumo-like squat. Talk about a total body workout! Needless to say, I switched machines quite quickly.
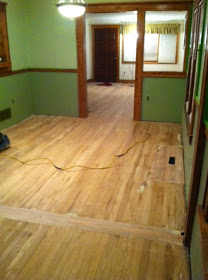
It’s a long way until we have naked floors!
After the floors were sanded, we wiped them down with a rag and mineral spirits. This cleans up all of the extra dust before staining.
Staining the Floors
Staining was a debacle in itself. We have A LOT of wood in our house: around the doors, around every window, every entryway, etc. The previous owners did a beautiful job, but the color is a sort of orange-y wood color. Ick.
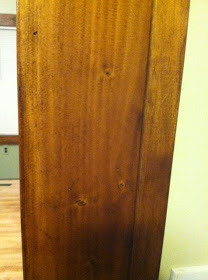
No way was I about to paint all of those molding white OR strip them all and stain them a darker color. With that being said, we wanted dark floors, so we had to find a color that went with our orange wood moldings. I took a piece of painted wood to my new besties at Sherwin-Williams and explained what we were trying to do. They were super helpful and explained the different types of stains and which colors were in our wood family. We ended up choosing Sherwin-Williams Wood Classics Oil Stain in Fruitwood.
After work, Jeff and I drove over to the house along with our delicious dinner of Taco Bell. (Yea, Supreme Tacos!) We started off staining in the corners of the living room. Be very careful on where you decide to start staining, otherwise you will be saying, “Nobody puts Baby in the corner” a la Dirty Dancing.
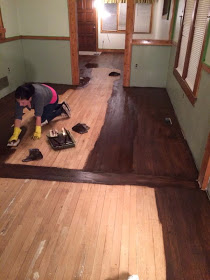
We used lambswool pads to rub in the stain, then waited the allotted time on the can before wiping off the stain with a rag. We wanted to make sure that the new wood didn’t come out a different color than the older wood, so we left the stain on the new wood just a few minutes longer. This was by far the easiest step of the whole refinishing process. I think we were done with both rooms in less than 2 hours. Woo hoo- an early night!
Finally, we were to the polyurethane step! We stepped into our house the next evening (with TB again!) and got to work. To put the poly on the floor, we used a paint roller with a long bar attachment and just rolled it on. This is a very stinky step in the process, so make sure to have your room well-ventilated.
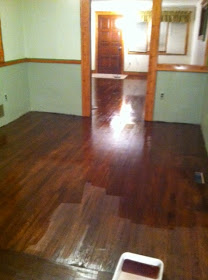
Once the whole floor was rolled, we called it a day. The floor needs two coats of poly, which required us to return the next day. When polyurethane dries it leaves behind tiny bubbles on the surface. To remedy this, we had to go over the surface of the floor with a light sanding by hand, then a wipe down with tack cloth to make sure there wasn’t any dust left behind. We rolled out another coat of poly, while singing “Roll Out” by Ludacris. Now all we had to do was wait for it to dry!
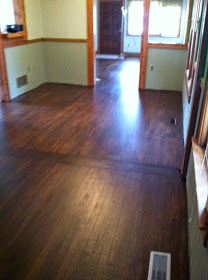
Let’s just take a trip down memory lane and recall what it used to look like in this room:
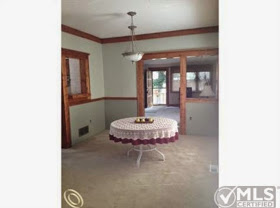
Such a big difference! Now, on to painting!